Building a Router with NixOS
I've now been using NixOS for one year. I use it to manage both my private PC and my laptop at work. Overall, it has been a great experience. I really appreciate the scale and control it brings to my digital life.
In May 2022, I stepped it up a notch by adding a third device running NixOS, namely a custom-built router! After a month of interspersed work I had successfully replaced my home network router.
In this blog post I'll go through why I embarked on this journey, how I did it, and lessons learned.
Note: I try to keep this blog post up-to-date with my current configuration. If you notice something that seems off, feel free to reach out.
Why? 🤔
I've had sporadic issues with my previous router (Asus N56U). It worked fine most of the time, but when it didn't it was bad:
- network speeds dropping off a cliff for a few minutes
- connectivity dying completely for a few seconds
For most activities this wasn't a deal breaker, but it was a huge pain not being able to take important meetings at home and be confident that I'd have a good connection. Routers should just work™ and this one didn't.
Selecting a new router
Earlier in the year, a friend was asking for shopping advice for a new router. We quickly agreed that regular consumer tests can't be relied on because they don't test network stability over time, but instead focus on measuring speed and latency. I couldn't give a recommendation, aside from referring to hardware that could be flashed with open source router software.
A few weeks or months after our conversation, I found out about PC Engines APU2. An x86 router with open source hardware that can be flashed with practically any Linux distribution. It seemed like a good solution to stability concerns: if you have complete control over your router, you can "just" fix it if something's not working reliably.
With NixOS in mind and a will to learn more about home networking, I was convinced that this would be a good choice. I ordered a unit from TekLager (not affiliated) with the following configuration:
- PC Engines APU2E0
- Compex WLE200NX Wireless NIC
- PC Engines APU Chassis
- 16GB mSATA SSD
- AC Power adapter
- USB-DB9F serial adapter
Some major selling points that made me decide that this router actually was a good choice:
- TekLager's excellent documentation:
- Serial connection in case I bork the network :)
- Low power consumption at ~6W (actually turned out to be ~12W)
- Lots of recommendations on Reddit and, above all, some people successfully running NixOS on APU2.
Hardware was assembled by the folks at TekLager, neatly packaged, and delivered within a few days. Then followed an intense, interspersed battle of configuration until I finally got it working at the end of May. As I'm writing this blog post, my home network is fully supported by this little beast!
Why NixOS?
There are a number of distributions that are designed to be run on routers. Why would I use NixOS instead of pfSense, DD-WRT, or OpenWRT?
If you are experienced with Nix(OS), it should come as no surprise to you that I want all my devices to use it. But if you're new to NixOS or haven't been sold on its benefits, I'd say that it boils down to three things:
Maintainability
Since I'm already using NixOS to configure my work & private PCs, the additional overhead of a new device is pretty small. This is mainly because I'm using a single Git repository to maintain all devices, so reusability is very high.
Package updates are easy, requiring only one or two commands. And updating to new releases is also relatively painless, just requiring a one-line change to bump the nixpkgs release. Furthermore, I will likely get these updates for free, since I'm already declaring them for my other devices.
Customizability
The router can be configured exactly as I want it to be. It will be running a subset of the same software with the same configurations as I'm used to having on my PCs. It will have Neovim and tmux, a range of networking tools, and dotfiles, all of them configured like I'm used to - with practically zero overhead.
Learning new things
I'm still a Nix newbie, so this is a good project to grow that skillset. And in particular, by forcing myself to declaritively design my home network I'll have a good opportunity to learn more about networking!
Why not a normal router?
Where's the fun in that? :)
Timeline 🕒
In real time it took about a month to get everything working, but in total I think I've spent less than 25 hours. I did most work before I had set up ActivityWatch, so I don't have any reliable data to go on. Most things were very easy to set up, but WiFi took a long time to get right.
The most time consuming task in the project though has definitely been writing this blog post (not included in the 25h)!
May 3: Ordered the package
May 6: Picked up the delivery
May 7: Installed NixOS and got the basic configs up and running
This was done over serial with a USB install. There were no surprises here if you're familiar with using serial.
For more detailed instructions on this piece, these references might help:
- This blog post which briefly describes how to install NixOS on the APU board.
- TekLager's tutorial on how to install Debian over serial on the APU board.
May 8: Basic MVP for wireless & wired working
Getting an initial wired connection was fairly straight forward, although I didn't add any features except being able to forward traffic and to accept SSH. With that of the way, I turned my attention to WiFi which was significantly harder to configure.
After a lot of struggling, I managed to get hostapd launching without errors, but to my surprise I was only getting ~10Mbit/s. Much lower than the benchmark done by TekLager at 200Mbit/s.
Since TekLager had achieved 200Mbit/s on OpenWRT, I thought it would be a good test to see if I could too. I flashed the board with OpenWRT instead and after a few minutes of basic setup in their web UI, I confirmed the ~200Mbit/s number. Evidently, the low speeds I had on NixOS was not hardware related.
K900 on the NixOS Matrix channel informed me that OpenWRT has a lot of patches on top of hostapd, as well as the wireless driver, which could be the differing factor.
Determined to fix this, I set out to find out how I could use the same patches that were used in OpenWRT while still using NixOS.
May 11, 14: Learned how to override Nix package attributes
This took quite a while to wrap my head around. As they say, Nix is super easy 95% of the time, but in the remaining 5% it's terribly difficult to control.
Having learnt how overlays work, I successfully managed to apply OpenWRT's patches on hostapd. Some of them didn't apply cleanly, such as the ones bringing in support for dbus which is an IPC software used in OpenWRT, so I ignored those.
With the patched version of hostapd running, I was then able to take the configuration that OpenWRT set up and reduce it until there were no superfluous or erroneous options left. And taking new measurements with iperf, I was able to get the same speeds as on OpenWRT! However, as explained in the entry for June 12 below, the patches were not what made the network speeds go up.
More details on how I added the patches can be found in this section.
May 14: WiFi network up and running, but DHCP wasn't working.
Looking at systemd logs on both the router and my PC, I could see that the WiFi protocol was working as intended. Logs looked something like this:
workstation kernel: wlp39s0: authenticate with 04:f0:21:ac:39:fa
workstation kernel: wlp39s0: send auth to 04:f0:21:ac:39:fa (try 1/3)
workstation kernel: wlp39s0: authenticated
workstation kernel: wlp39s0: associate with 04:f0:21:ac:39:fa (try 1/3)
workstation kernel: wlp39s0: RX AssocResp from 04:f0:21:ac:39:fa (capab=0x411 status=0 aid=3)
workstation kernel: wlp39s0: associated
But after being authenticated, clients would not receive an IP address. I didn't find out why and other things in life took precedent, so the project got benched for a while.
May 29: Fix the DHCP issue
Two weeks later, I took the project up again and found the issue immediately. The firewall was blocking clients from negotiating an IP over DHCP. Fixing that was easy, and from this point on it was mostly smooth sailing.
May 30: All vital features working!
After a lot of system rebuilds and experimentation, I finally got all vital features working. This was the day when I replaced my old router. Since then, the APU2 has been powering my home network.
May 31: Add static routes with DnsMasq
Since I have a few devices that I want to be able to SSH to or mount files from/to, it makes things much easier if I can guarantee that they'll have the same IP. This was a simple one-line change per device to DnsMasq's config.
June 2: Add Grafana monitoring
I've been using Grafana at work a lot for monitoring & alerts, and it seemed like a great fit to monitor my home network health. Xe has an excellent blog post from 2020 on how to set it up on NixOS, and getting the bare minimum up and running is ridiculously simple:
{ config, pkgs, ... }:
{
  # https://xeiaso.net/blog/prometheus-grafana-loki-nixos-2020-11-20
  services.grafana = {
    enable = true;
    port = 8888;
    addr = "0.0.0.0";
    dataDir = "/var/lib/grafana";
  };

  services.prometheus = {
    enable = true;
    port = 9990;
    exporters = {
      node = {
        enable = true;
        enabledCollectors = [ "systemd" ];
        port = 9991;
      };
    };
    scrapeConfigs = [
      {
        job_name = "chrysalis";
        static_configs = [{
          targets = [ "127.0.0.1:${toString config.services.prometheus.exporters.node.port}" ];
        }];
      }
    ];
  };
}
These 30 lines do three things:
- Enables Grafana to run as a service and spins up its Web UI at
0.0.0.0:8888(accessible to any network interface, i.e. any connected client as long as it's allowed by the firewall). - Enables Prometheus to collect Systemd metrics.
- Makes Prometheus available as a data source running on
127.0.0.1:9991(only accessible on the loopback interface, i.e. only by the router itself).
Note that this opens up Grafana to the public as well, since traffic from enp1s0 is also able to reach 0.0.0.0. However, it's not a problem because traffic to port 8888 from enp1s0 will be blocked by the firewall.
June 5: Revert from 5GHz WiFi to 2.4Ghz, since our robot vacuum cleaner didn't support 5GHz.
When trying to clean our apartment, we found out that our RoboRock S5 Max didn't support 5GHz WiFi. Since my NIC can only support 2.4 or 5GHz at any given time, I therefore had to regress to 2.4Ghz.
This actually turned out to be a good thing though, since I didn't need the extra speed that 5GHz offers and the range with 2.4GHz is much better.
June 12: Publish this blog post & verify hostapd patches
To really find out what made WiFi speeds jump from 10Mbit/s to 200, I removed the OpenWRT patches and rebuilt the system to see if that was the differing factor. Using iperf, I found no significant difference between patched and non-patched builds. This means that it was not the patches from OpenWRT that made the WiFi go faster, but rather config changes I made to Hostapd at the same time. Exactly what those changes were, I don't know - and I don't have the interest to pursue that rabbit hole.
June 26: Add WireGuard
I had heard about WireGuard from a colleague a few years back, but I had no real conceptions of how it worked besides that it was some kind of improvement over OpenVPN.
I watched this talk by the creator of WireGuard and was convinced. Basically it's a VPN based on asymmetric cryptography (public/private keys). Compared to other VPNs it's ridiculously easy to set up. With it I can access my photos and home media from anywhere, even on my phone.
As a prerequisite step I configured my domain vpn.skogsbrus.xyz and the router to use dynamic DNS. This way vpn.skogsbrus.xyz will always resolve to my router, regardless of its IP address.
With that done, I added WireGuard.
With this commit there were a couple of interesting changes:
- Add WireGuard, running on all my managed machines.
- My servers are given static IPs and hostnames with DnsMasq
- DnsMasq now resolves the
foobar.homedomain to the local IP of the hostfoobar
With this all of my devices use WireGuard to connect to my home network. They use my router as their primary DNS server and are thus able to resolve the .home domains configured by DnsMasq.
June 26: Improve firewall
In my first configuration I had a rather simplistic firewall: trusted interfaces and untrusted interfaces. I did not distinguish between outbound and inbound connections for the untrusted interfaces, meaning that the ports I opened for the guest network were also opened for inbound traffic from "the outside".
To fix this, I had to dig through a few Github issues to find the correct syntax. The solution was to specify allowed TCP/UDP ports per interface instead of globally. See more in the Firewall section below.
This was fixed in the same commit as the one introducing Wireguard. Commit here.
July 10: Modularize config
This was relatively unrelated to the router configuration itself, but was a refactoring of my whole NixOS repository. Instead of using things like devices' host names to configure conditional logic, every service or app is now a standalone module that can be enabled by devices.
For any given machine foobar, it is now defined as follows:
- It is "declared" in
flake.nix - Its system configuration is imported from
hosts/foobar/system.nix - Its home configuration is imported from
hosts/foobar/home.nix - Its hardware configuration is imported from
hosts/foobar/hardware.nix
The code 👨💻
My full configuration of devices is available on Github.
For all of my current devices, I am currently maintaining 17K lines of Nix code. If you ignore auto-generated code, we're instead looking at 2K lines.
Of those 2K lines, about 500 are specific to my router's configuration.
If you want to explore the code on your own, here are some tips:
- The top level configurations of all devices are listed under
nixosConfigurationsinflake.nix. hosts/router/hardware.nixcontains the hardware specific configurations for the router.hosts/router/system.nixcontains the system configurations for the router.hosts/router/home.nixcontains my user configuration for the router.sys/router.nixconfigures everything a router should do (DHCP, WiFi, network bridge, IP forwarding, ...)sys/grafana.nixconfigures Grafana (and its data sources). Used to monitor system & network health.
Overview 🗺️
Schematic
This is a very high level sketch of how the network is set up.
         ISP
          |
      Ethernet (enp1s0)
          |
       ------------------------------------------
       |      APU2                              |
       ------------------------------------------
        |              |               |
   WiFi (wlp3s0)     bridge (br0)  wireguard (wg0)
        |       -------|               |
     --------   |      |               |
     |      |   |      |               |
  guest   private      |            laptop / phone / etc
                       |
                 Ethernet (enp2s0)
                       |
                    Wired LAN
The guest network is set up with:
- Separate WiFi network configured with hostapd
- Client isolation (hostapd setting)
- Its own virtual NIC
- Its own subnet
- Only a basic set of ports are open
The private network is set up with:
- All ports allowed
- A bridge between wired and wireless clients, enabling them to communicate with each other
WireGuard is set up so that:
- Each peer is given an IP in a subnet specific for WireGuard
- The router allows any authenticated peer to access the private bridge subnet
In practice, this means that
- Guests can only do basic web browsing / emails / git
- Guests can't ssh to the router, even if they have the correct key
- Guests can't reach other clients on the same network nor on the private network
- Guests can't reach any service hosted on the router, such as Grafana, because it'll be blocked by the firewall
- Since guests don't have access to anything besides "the internet", I don't have to care about who I give my WiFi password to
- I can access any device on my private network from anywhere, as long as the device I'm using is an authenticated WireGuard peer with my router.
Reality
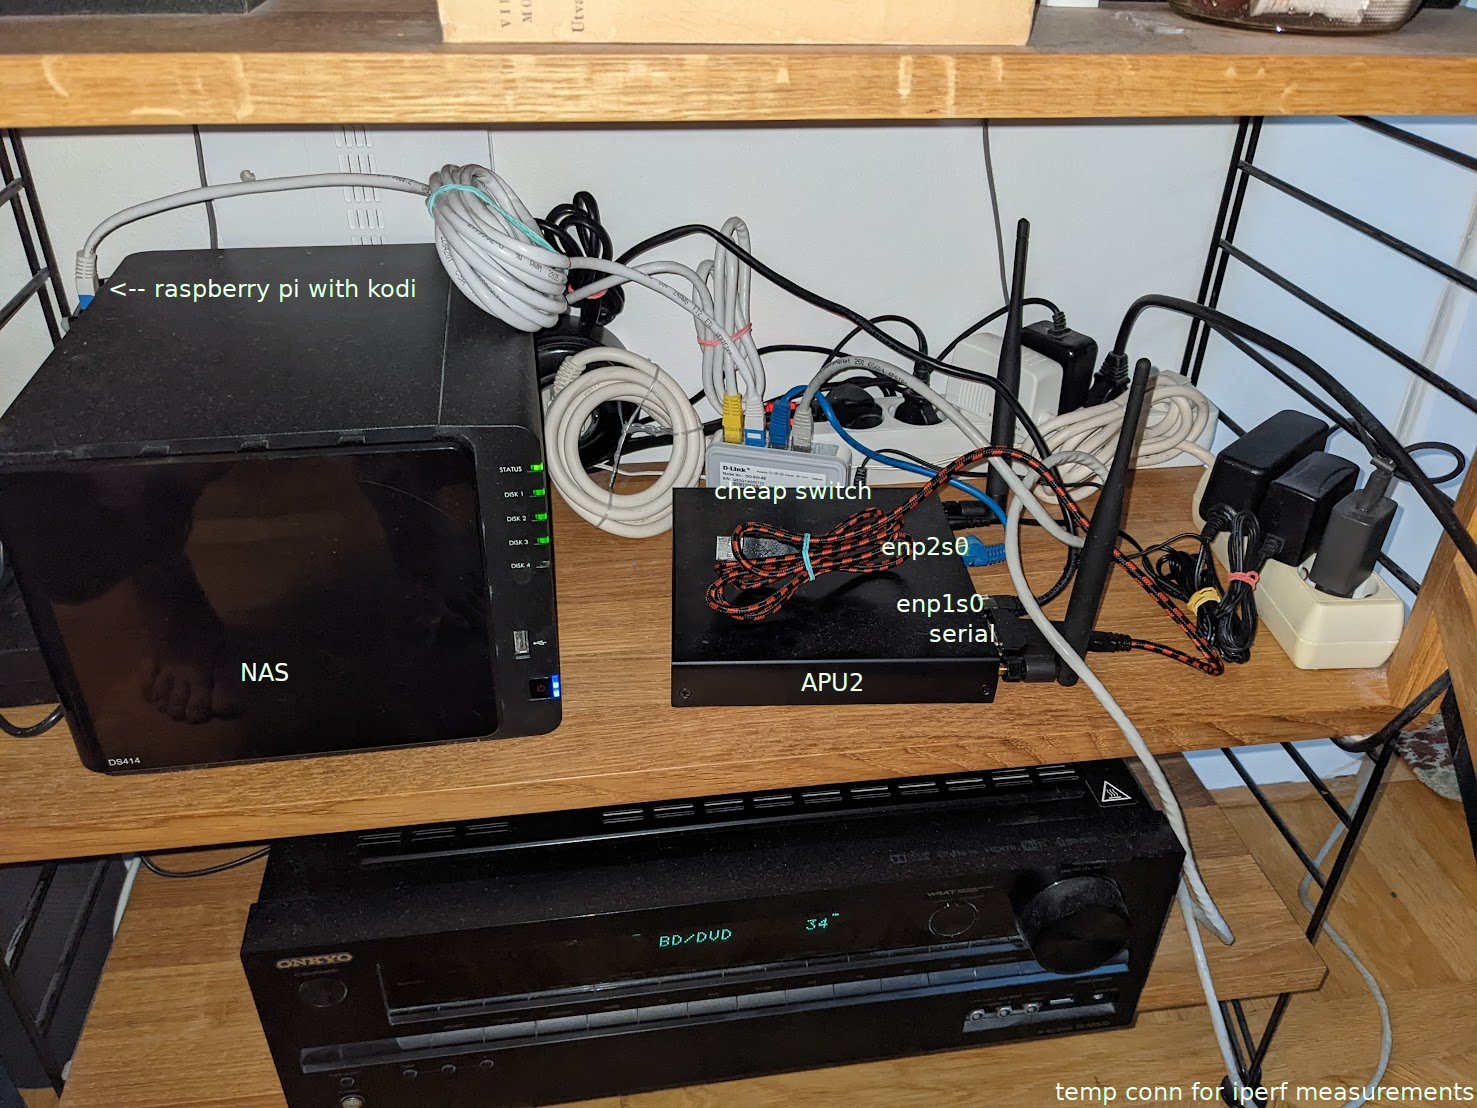
This is how it looks in real life. I've got two permanent units connected over wire: a NAS and a Raspberry Pi (the third wire connected to the switch is temporary). The rest of all my devices are connected over WiFi.
Things I've learned 🤓
I've had a vague idea about most of these topics, but I haven't fully understood any of them. I still don't understand the details of many of these things, mainly because NixOS makes it so easy to configure :) But still, I have learned a lot!
IP forwarding
To quote an answer to the Stack Overflow question "IP Forwarding = when and why is this required?":
IP forwarding should be enabled when you want the system to act as a router, that is transfer IP packets from one network to another.
This will allow packets to flow between different network interfaces. Unless enabled, these packets would be dropped by the kernel. Having this enabled is what allows us to communicate with the outside world.
  boot = {
    kernel = {
      sysctl = {
        "net.ipv4.conf.all.forwarding" = true;
        "net.ipv6.conf.all.forwarding" = true;
      };
    };
  };
NAT
NAT is an abbreviation of Network address translation. The router is the only device that is public facing. Any packets going to clients connected to the router will be addressed to the router. It is then the router's responsibility to forward the packet to correct client.
In NixOS, we can configure it like so:
  networking.nat = {
    enable = true;
    internalInterfaces = [
      "br0"
      "wguest"
    ];
    externalInterface = "enp1s0";
  };
This means that any traffic coming from the enp1s0 interface to br0 or wguest will need to translate the destination IP with NAT. Likewise, for any traffic from br0 or wguest the source IP will be replaced with the router's external IP.
For more information, see Wikipedia. The image in their article about NAT is great to get an intuitive understanding of what's happening.
Network interfaces
A (virtual) network interface (as shown in e.g. ip link) is an abstraction that can correspond directly to a network interface controller (NIC), but it doesn't have to. An example of a real use case of these abstracted interfaces, which we will see later on, is to separate a NIC into multiple virtual interfaces and then apply different traffic rules on those abstractions. So they use the same hardware, but their traffic is treated differently.
Network bridging
In order to enable communication between wired and wireless clients, we need a network bridge. A network bridge will allow traffic from two interfaces to act as if come from the same interface.
With NixOS, we configure this like so:
  networking.bridges = {
    br0 = {
      interfaces = [
        "enp2s0"
        "wlp3s0"
      ];
    };
  };
  networking.interfaces = {
    br0 = {
      useDHCP = false;
      ipv4.addresses = [
        {
          address = "192.168.1.1";
          prefixLength = 24;
        }
      ];
    };
  };
Note that we specify a subnet IP block for the bridge and not individually for the network interfaces as devices on those will be assigned IPs from the bridge's IP block.
DHCP
DHCP is a client-server protocol, where clients are given an IP address by a server. We'll need to use the router as a DHCP server in order for our clients to receive an IP address. Clients need to have an IP address in order to receive data (how can the mailman deliver your mail if he doesn't know your address?).
This protocol is also used between the router and ISP, in order for the router to receive an external IP address.
A fun detail I discovered when I hadn't gotten DHCP to work yet, was that there is a reserved block of IP addresses used when no IP address is specified (by static assignment or DHCP): 169.254.0.0/16.
Which interfaces should the router act as a server on?
In NixOS, the config option networking.useDHCP and networking.interfaces.x.useDHCP configure whether the device should request an IP as a DHCP client. This makes sense as most devices aren't routers, but for a router we want to make some special configurations here.
For the physical network interfaces, we configure DHCP like so:
  networking.useDHCP = false; # Disable it by default
  networking.interfaces.enp1s0.useDHCP = true; # Request an IP from the ISP
  networking.interfaces.enp2s0.useDHCP = true; # Request an IP on the local wired interface
  networking.interfaces.wlp3s0.useDHCP = true; # Request an IP on the wireless interface
Now, enabling it for enp1s0 makes sense because we need to be assigned an external IP by the internet service provider. But why are we acting as a DHCP client on the local interfaces enp2s0 and wlp3s0?
If you want to configure the network based on the physical interfaces directly, you wouldn't. But since I've configured my network with a bridge and a virtual interface for the guest network, we enable DHCP on the physical interfaces so that they are assigned IPs from the virtual interfaces. [note: I'm speculating here, take it with a grain of salt and please LMK if it is wrong!]
DnsMasq
A service responsible for DNS and DHCP. A very powerful little tool!
With this small config, we've got everything we need.
domain-neededmakes sure that we ignore DNS requests that don't have a dot or domain specified. I'm not sure what threat this prevents, but why not!- The list of
interfaceare matched in order with the list ofdhcp-range, so the network bridgebr0is assigned the IP block192.168.1.10-192.168.1.254andwguestis assigned192.168.2.10-192.168.2.254. - The
24hspecified at the end ofdhcp-rangeis the lease time in which to cache a client's IP address. So if a client reconnects within that time range, it will be assigned the same IP. - The
dhcp-hostentries specify static IP addresses for a couple of devices on my network
  services.dnsmasq = {
    enable = true;
    servers = [ "9.9.9.9" "1.1.1.1" ];
    extraConfig = ''
      domain-needed
      interface=br0
      interface=wguest
      dhcp-range=192.168.1.10,192.168.1.254,24h
      dhcp-range=192.168.2.10,192.168.2.254,24h
      # kodi
      dhcp-host=b8:27:eb:84:09:f8,192.168.1.90
      # NAS
      dhcp-host=00:11:32:33:30:5b,192.168.1.65
      # workstation
      dhcp-host=30:9c:23:1b:a5:4d,192.168.1.83

    '';
  };
Hostapd
Described in its man-page as "A user spaces daemon for access point and authentication servers". Super hard to configure properly.
Here are some vital references I've found:
- https://wiki.gentoo.org/wiki/Hostapd
- https://w1.fi/cgit/hostap/plain/hostapd/hostapd.conf
I feel more as if I've learnt how to configure Hostapd than how WiFi networks work in general. But maybe that's not a bad thing.
To see my full Hostapd configuration, have a look at my Github.
Overriding nix package attributes
To add the patches from OpenWRT, I had to override the patches attribute of the hostapd package by using a feature in Nixpkgs called overlays.
The end result looked something like this:
  nixpkgs.overlays = [
    (self: super: {
      hostapd = super.hostapd.overrideAttrs (old: rec {
        patches = [
          (builtins.fetchurl {
            url = "https://raw.githubusercontent.com/openwrt/openwrt/master/package/network/services/hostapd/patches/001-wolfssl-init-RNG-with-ECC-key.patch";
            sha256 = "1h4wqn6dpc5vw19428v6s49i3xsdqc1ikwv6gvdhs2ly98cxwb91";
          })
          ...
        ]
      })
    })
  ];
In addition to adding the patches, I made sure to use Hostapd 2.10 instead of 2.9 and edited the unpackPhase to include files added by OpenWRT that were referenced but not included in their patches.
However, as explained previously, I later discovered that the patches made no noticable difference in terms of network speed. So I removed them. I still use an overlay to use version 2.10 instead though.
Firewall
NixOS has a firewall module with which you can neatly specify a lot of rules. I thought it would make sense to be strict about what clients on the guest network should be able to do, but not restrict traffic on my private network.
A simple configuration could look something like this:
  networking.firewall = {
    enable = true;
    trustedInterfaces = [ ];
    allowedTCPPorts = [
    ];
    allowedUDPPorts = [
    ];
  };
However, there are two issues with this.
Inbound vs outbound
Tha allowedTCPPorts and allowedUDPPorts attributes specify allowed ports for all interfaces. If we open up 2222 for TCP, this also also opens up the same port for the outwards facing interface.
To fix this, we shold specify allowed ports per interface instead of globally:
  networking.firewall = {
    enable = true;
    trustedInterfaces = [ "br0" "wg0" ];

    interfaces = {
      enp1s0 = {
        allowedTCPPorts = [ ];
        allowedUDPPorts = [
          # Wireguard
          666
        ];
      };
      # https://serverfault.com/a/424226
      wguest = {
        allowedTCPPorts = [
          # DNS
          53
          # HTTP(S)
          80
          443
          110
          # Email (pop3, pop3s)
          995
          114
          # Email (imap, imaps)
          993
          # Email (SMTP Submission RFC 6409)
          587
          # Git
          2222
        ];
        allowedUDPPorts = [
          # https://serverfault.com/a/424226
          # DNS
          53
          # DHCP
          67
          68
          # NTP
          123
        ];
      };
    };
  };
SSH & Port 22
With the above firewall rules, clients on an untrusted interfaces will still be able to SSH to the router (if they have my key), even if port 22 isn't explicitly opened. This is because the ssh service in NixOS will open the firewall unless we explicitly tell it not to:
  # Prevent sshd from opening port 22 (circumventing the firewall)
  services.openssh.openFirewall = false;
Stability 🤹
I don't have good enough monitoring in place yet to give a factual report about stability. When I do, I'll come back with data and my experience on how things have gone!
Speed 🚀
With Ethernet, direct:
$ iperf -c 192.168.1.1
Connecting to host 192.168.1.1, port 5201
[  5] local 192.168.1.43 port 43824 connected to 192.168.1.1 port 5201
[ ID] Interval           Transfer     Bitrate         Retr  Cwnd
[  5]   0.00-1.00   sec   114 MBytes   953 Mbits/sec    0    375 KBytes
[  5]   1.00-2.00   sec   113 MBytes   945 Mbits/sec    0    375 KBytes
[  5]   2.00-3.00   sec   112 MBytes   942 Mbits/sec    0    570 KBytes
[  5]   3.00-4.00   sec   113 MBytes   946 Mbits/sec    0    570 KBytes
[  5]   4.00-5.00   sec   112 MBytes   937 Mbits/sec    0    570 KBytes
[  5]   5.00-6.00   sec   112 MBytes   937 Mbits/sec    0    570 KBytes
[  5]   6.00-7.00   sec   113 MBytes   949 Mbits/sec    0    570 KBytes
[  5]   7.00-8.00   sec   112 MBytes   939 Mbits/sec    0    570 KBytes
[  5]   8.00-9.00   sec   112 MBytes   938 Mbits/sec    0    570 KBytes
[  5]   9.00-10.00  sec   113 MBytes   945 Mbits/sec    0    570 KBytes
- - - - - - - - - - - - - - - - - - - - - - - - -
[ ID] Interval           Transfer     Bitrate         Retr
[  5]   0.00-10.00  sec  1.10 GBytes   943 Mbits/sec    0             sender
[  5]   0.00-10.00  sec  1.10 GBytes   941 Mbits/sec                  receiver

iperf Done.
With Ethernet, via switch:
The switch is a cheap thing I picked up a few years ago, capped at 100Mbit/s. Until I replace it with a gigabit switch, this is the maximum speed with which my wired clients can communicate.
$ iperf -c 192.168.1.1
Connecting to host 192.168.1.1, port 5201
[  5] local 192.168.1.43 port 43938 connected to 192.168.1.1 port 5201
[ ID] Interval           Transfer     Bitrate         Retr  Cwnd
[  5]   0.00-1.00   sec  11.8 MBytes  99.0 Mbits/sec    0    139 KBytes
[  5]   1.00-2.00   sec  11.3 MBytes  94.6 Mbits/sec    0    139 KBytes
[  5]   2.00-3.00   sec  11.3 MBytes  94.6 Mbits/sec    0    146 KBytes
[  5]   3.00-4.00   sec  11.3 MBytes  94.6 Mbits/sec    0    146 KBytes
[  5]   4.00-5.00   sec  11.3 MBytes  94.6 Mbits/sec    0    146 KBytes
[  5]   5.00-6.00   sec  11.0 MBytes  92.2 Mbits/sec    0    146 KBytes
[  5]   6.00-7.00   sec  11.3 MBytes  94.6 Mbits/sec    0    146 KBytes
[  5]   7.00-8.00   sec  11.3 MBytes  94.6 Mbits/sec    0    146 KBytes
[  5]   8.00-9.00   sec  11.3 MBytes  94.6 Mbits/sec    0    146 KBytes
[  5]   9.00-10.00  sec  11.3 MBytes  95.1 Mbits/sec    0    216 KBytes
- - - - - - - - - - - - - - - - - - - - - - - - -
[ ID] Interval           Transfer     Bitrate         Retr
[  5]   0.00-10.00  sec   113 MBytes  94.9 Mbits/sec    0             sender
[  5]   0.00-10.00  sec   112 MBytes  94.1 Mbits/sec                  receiver

iperf Done.
johanan@workstation (master) ~/os
With 5GHz WiFi:
$ iperf -c 192.168.1.1
Connecting to host 192.168.1.1, port 5201
[  5] local 192.168.1.83 port 43332 connected to 192.168.1.1 port 5201
[ ID] Interval           Transfer     Bitrate         Retr  Cwnd
[  5]   0.00-1.00   sec  22.9 MBytes   192 Mbits/sec    0    918 KBytes
[  5]   1.00-2.00   sec  21.2 MBytes   178 Mbits/sec    0   1.76 MBytes
[  5]   2.00-3.00   sec  22.5 MBytes   189 Mbits/sec    0   2.78 MBytes
[  5]   3.00-4.00   sec  22.5 MBytes   189 Mbits/sec    0   3.00 MBytes
[  5]   4.00-5.00   sec  22.5 MBytes   189 Mbits/sec    0   3.00 MBytes
[  5]   5.00-6.00   sec  25.0 MBytes   210 Mbits/sec    0   3.00 MBytes
[  5]   6.00-7.00   sec  22.5 MBytes   189 Mbits/sec    0   3.00 MBytes
[  5]   7.00-8.00   sec  22.5 MBytes   189 Mbits/sec    0   3.00 MBytes
[  5]   8.00-9.00   sec  22.5 MBytes   189 Mbits/sec    0   3.00 MBytes
[  5]   9.00-10.00  sec  23.8 MBytes   199 Mbits/sec    0   3.00 MBytes
- - - - - - - - - - - - - - - - - - - - - - - - -
[ ID] Interval           Transfer     Bitrate         Retr
[  5]   0.00-10.00  sec   228 MBytes   191 Mbits/sec    0             sender
[  5]   0.00-10.01  sec   227 MBytes   191 Mbits/sec                  receiver

iperf Done.
With 2.4GHz WiFi:
Theoretically, 2.4GHz should be able to support faster speeds than this. There might be a few improvements that can be made here with hostapd, but I will most likely not experiment with it since I don't really need a faster connection than this.
$ iperf -c 192.168.1.1
Connecting to host 192.168.1.1, port 5201
[  5] local 192.168.1.83 port 55626 connected to 192.168.1.1 port 5201
[ ID] Interval           Transfer     Bitrate         Retr  Cwnd
[  5]   0.00-1.00   sec  11.2 MBytes  94.3 Mbits/sec    0    370 KBytes
[  5]   1.00-2.00   sec  8.64 MBytes  72.5 Mbits/sec    0    386 KBytes
[  5]   2.00-3.00   sec  9.69 MBytes  81.3 Mbits/sec    0    469 KBytes
[  5]   3.00-4.00   sec  8.70 MBytes  73.0 Mbits/sec    0    491 KBytes
[  5]   4.00-5.00   sec  10.3 MBytes  86.5 Mbits/sec    0    513 KBytes
[  5]   5.00-6.00   sec  8.29 MBytes  69.5 Mbits/sec    0    563 KBytes
[  5]   6.00-7.00   sec  8.05 MBytes  67.6 Mbits/sec    0    567 KBytes
[  5]   7.00-8.00   sec  6.77 MBytes  56.8 Mbits/sec    0    567 KBytes
[  5]   8.00-9.00   sec  8.02 MBytes  67.2 Mbits/sec    0    567 KBytes
[  5]   9.00-10.00  sec  10.3 MBytes  86.3 Mbits/sec    0    597 KBytes
- - - - - - - - - - - - - - - - - - - - - - - - -
[ ID] Interval           Transfer     Bitrate         Retr
[  5]   0.00-10.00  sec  90.0 MBytes  75.5 Mbits/sec    0             sender
[  5]   0.00-10.01  sec  86.8 MBytes  72.7 Mbits/sec                  receiver

iperf Done.
Was it worth it? 💸⏳
Was it worth the time?
I think so! It's been a very fun and rewarding project. Most side projects I work on tend to get discontinued after a while, but since this has a huge impact on my daily life it has been very motivating to work on!
Was it worth the money?
For me, yes. There are surely tons of cheaper and better routers out there. But with a router completely under my control, with a distribution that I can work efficiently with, I think I've got a much greater chance to guarantee network stability than what I would have with an off-the-shelf router.
It's also an investment in my skills, with a very good potential ROI as I'm still very early in my career.
Future work 🤸
- IPv6
- Improve monitoring & set up alerts
- Set up a third network for IOT devices
Final notes
- I can't count how many times the serial connection saved me. Without it I'd have bricked the router by making it inaccessible.
- I think it's pretty insane how relatively easy this was to set up. There's just so much power that comes included with NixOS.
- Don't forget to delete old builds when you don't need them anymore! With 300(!) system generations, I was barely able to fit anything else on the system. That's pretty cool though.
Thanks 🙏
I could not have done this project on my own. Thank you to all software contributors, authors, and maintainers. And a special thanks to:
- K900 for always putting up with my questions on NixOS's Matrix channel.
- Xe, for their excellent blog posts on Nix & NixOS.
- Francis Begyn who last year built a NixOS router with the APU2 as well and whose blog post has helped a ton.
- Jonatan, for your excellent advice and proof reading.